
Modules
This section presents our modules user flow and how to integrate them. All our modules use the same integration pattern. Once you have done one module integration, it is only a matter of using the right platform credentials to integrate the other modules.
You should also read the Integration guide.
Single payments
Single UX
Below screenshot shows a demo render of the card form widget embbed into a sample payment page (below "Pay by credit card").
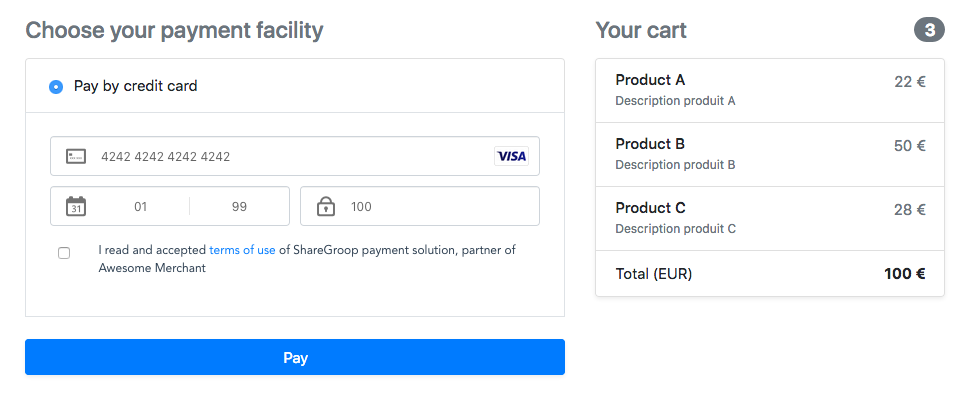
Every elements outside are samples, supposed to represent your payment page (listing, cart, pay button, etc.)
The card form rendering may vary depending on the orchestration model choosen for your platform
Basics
This module allows you to propose traditional single payment to your buyers.
Below is a sequence diagram explaining the laying foundations of ShareGroop integration, on which other modules rest on. The diagram may vary a little, depending on the modules and choices of integrations you make, but the steps are overall the same. Once you have done the work for 1 module, you have done almost all of them; and benefit from further features without additonnal developpments (aside calling the module corresponding credentials).
- You create an order for payment
- You load the widget or redirect the users for them to pay on our modules UXs (depending on your integration choice)
- Once the user paid, you check for payment confirmation (synchronously, or asynchronously via our webhooks)
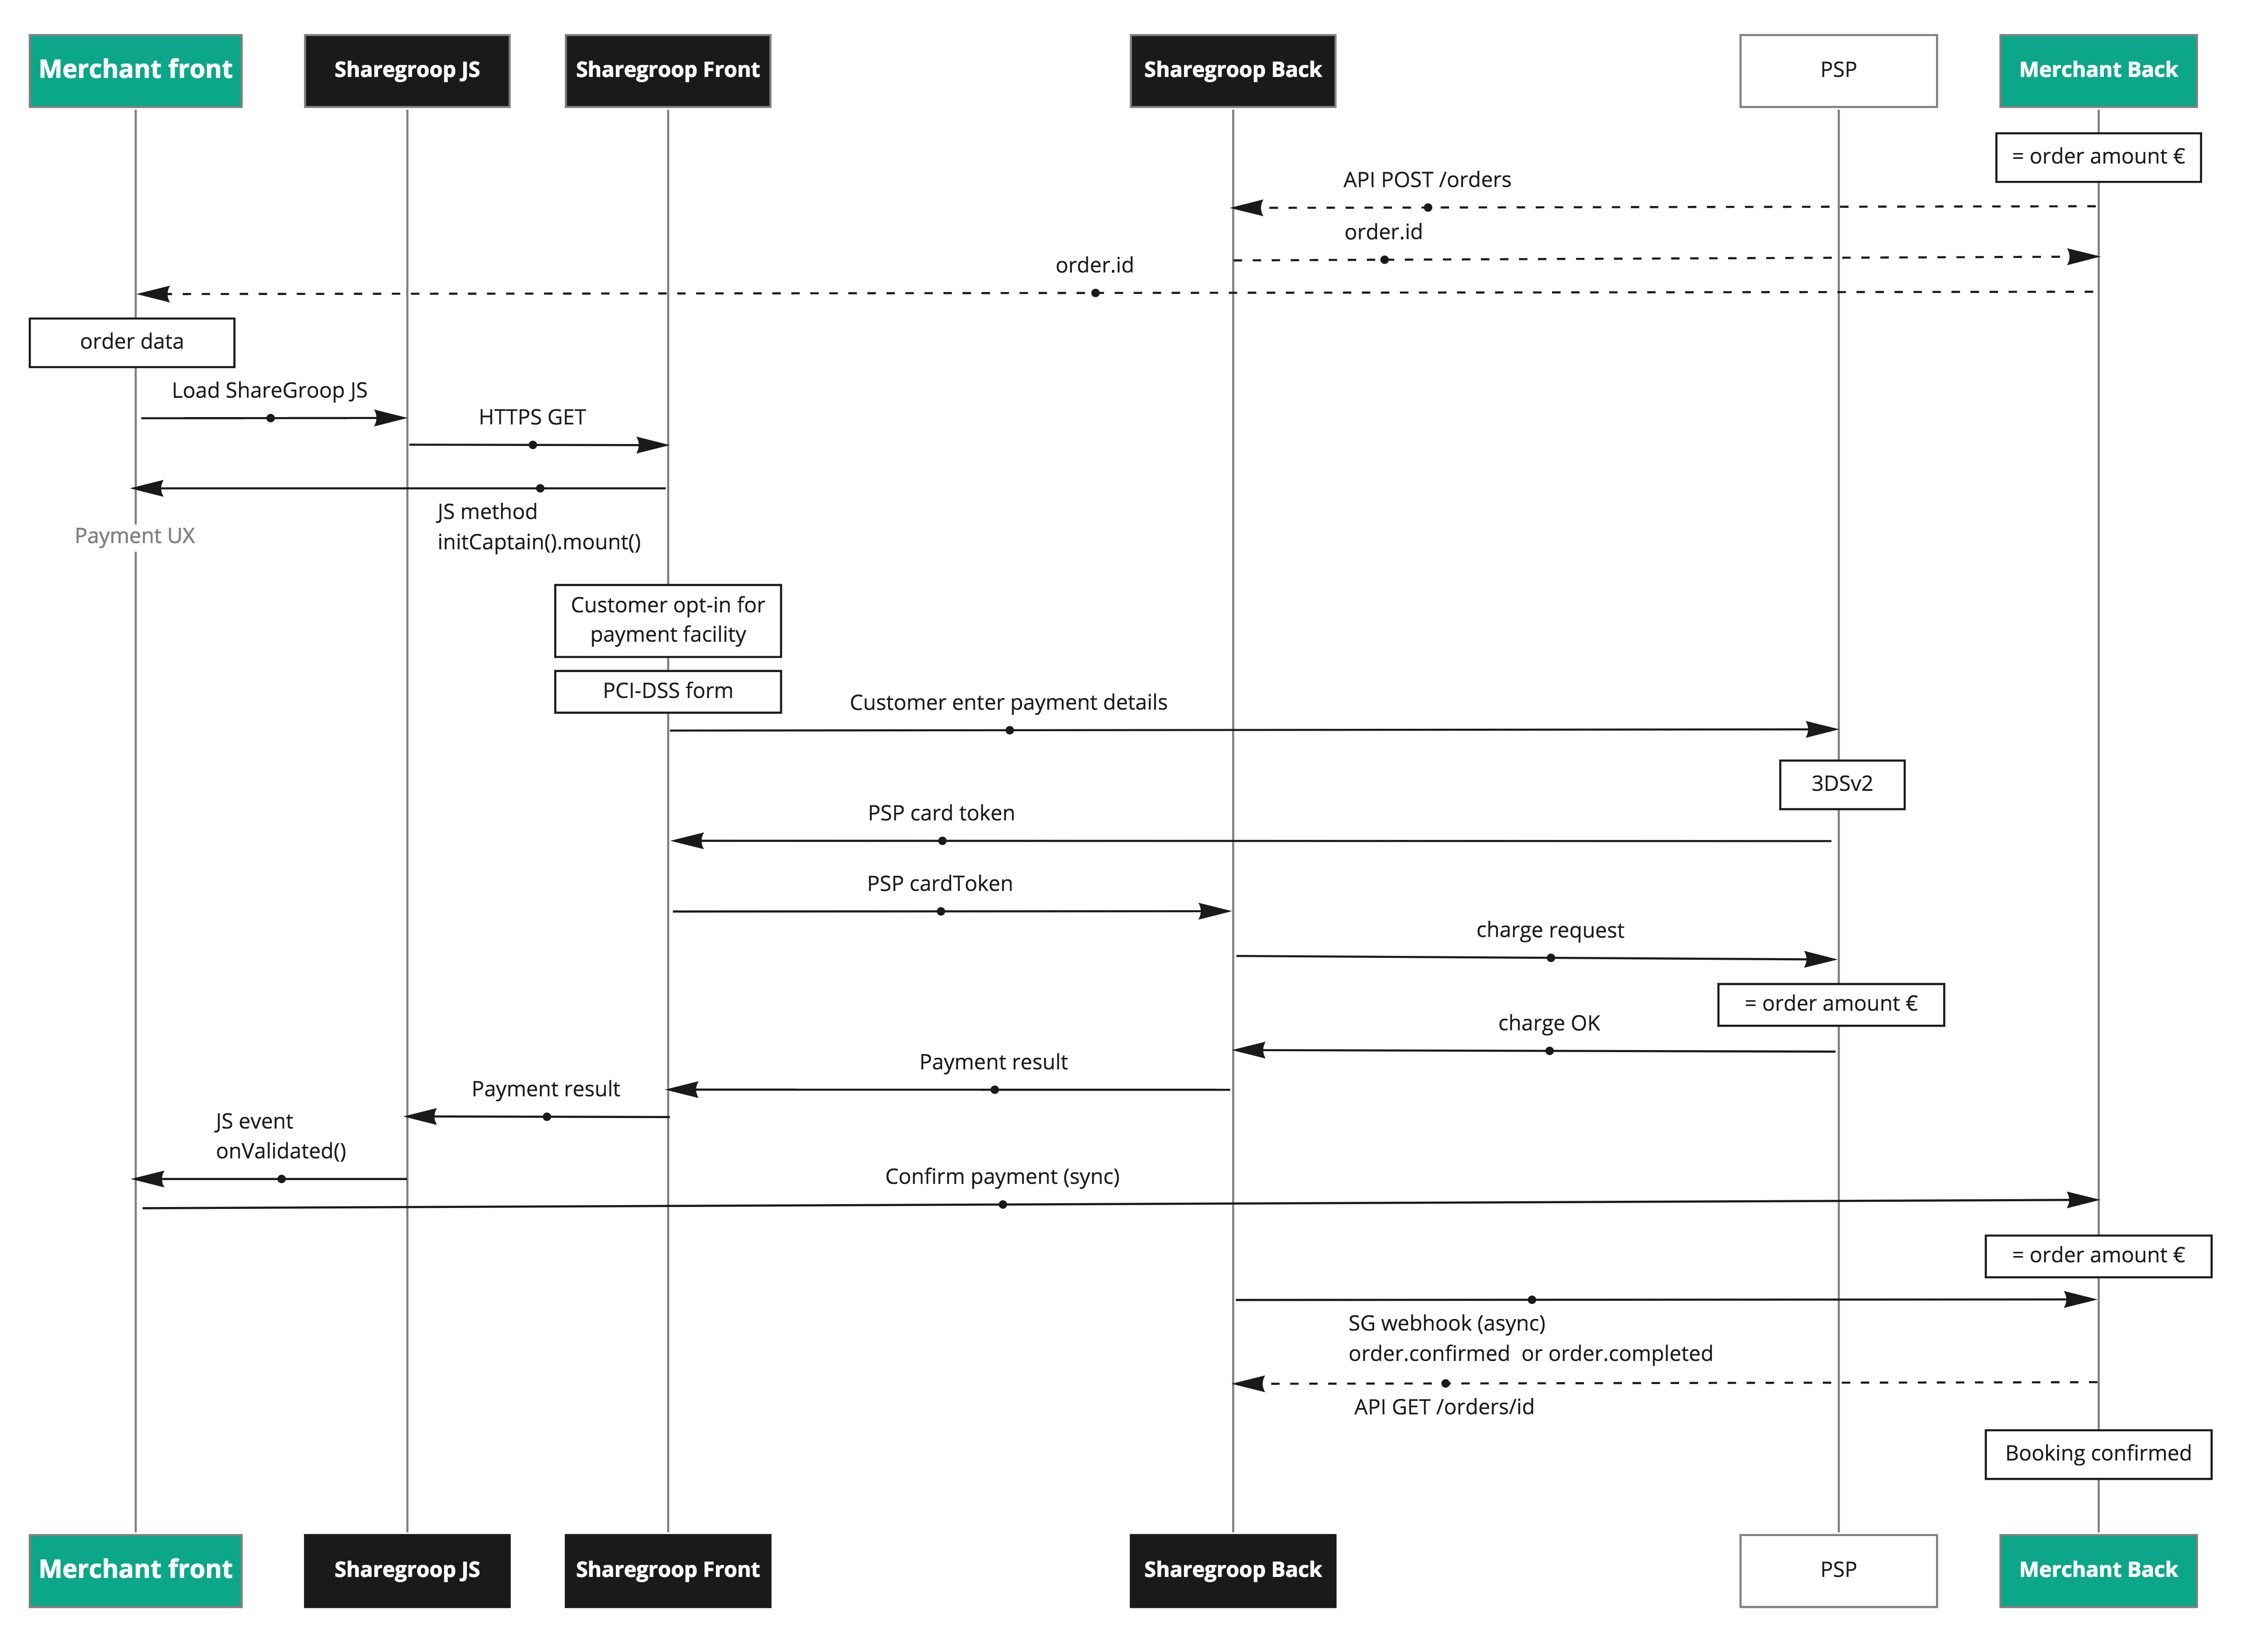
1. Create an order
Create an order using your corresponding platform secret api key.
You can also avoid this step by loading directly the widget into you page using the front-end integration.
The order will have order.ux: single
2. The user pays
Simply load our Captain component and awaits the component event onValidated.
Or if you prefer, you can integrate a more traditional payment redireciton to our hosted page.
Also, if you have one payment button to trigger all your (existing) payments, you should also check for your external call to action integration feature.
3. Then, what ?
You should back-end check for order confirmation.
See what's next.
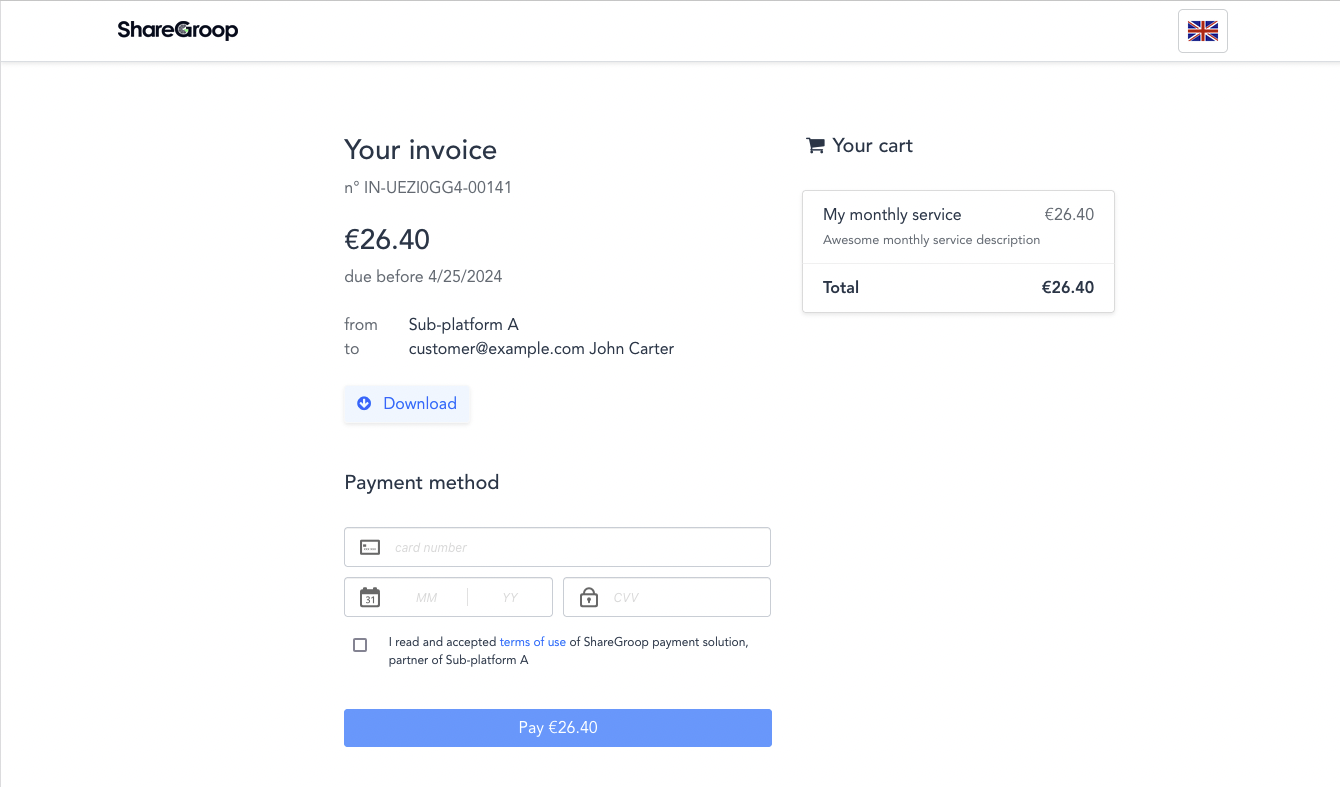
Split payments
This module allows you to Split a payment among multiple co-buyers until a due date.
Split UX
Below screenshot shows a demo of the Split UX widget embbed into a sample payment page (inside the container below "Share the payment with your group").

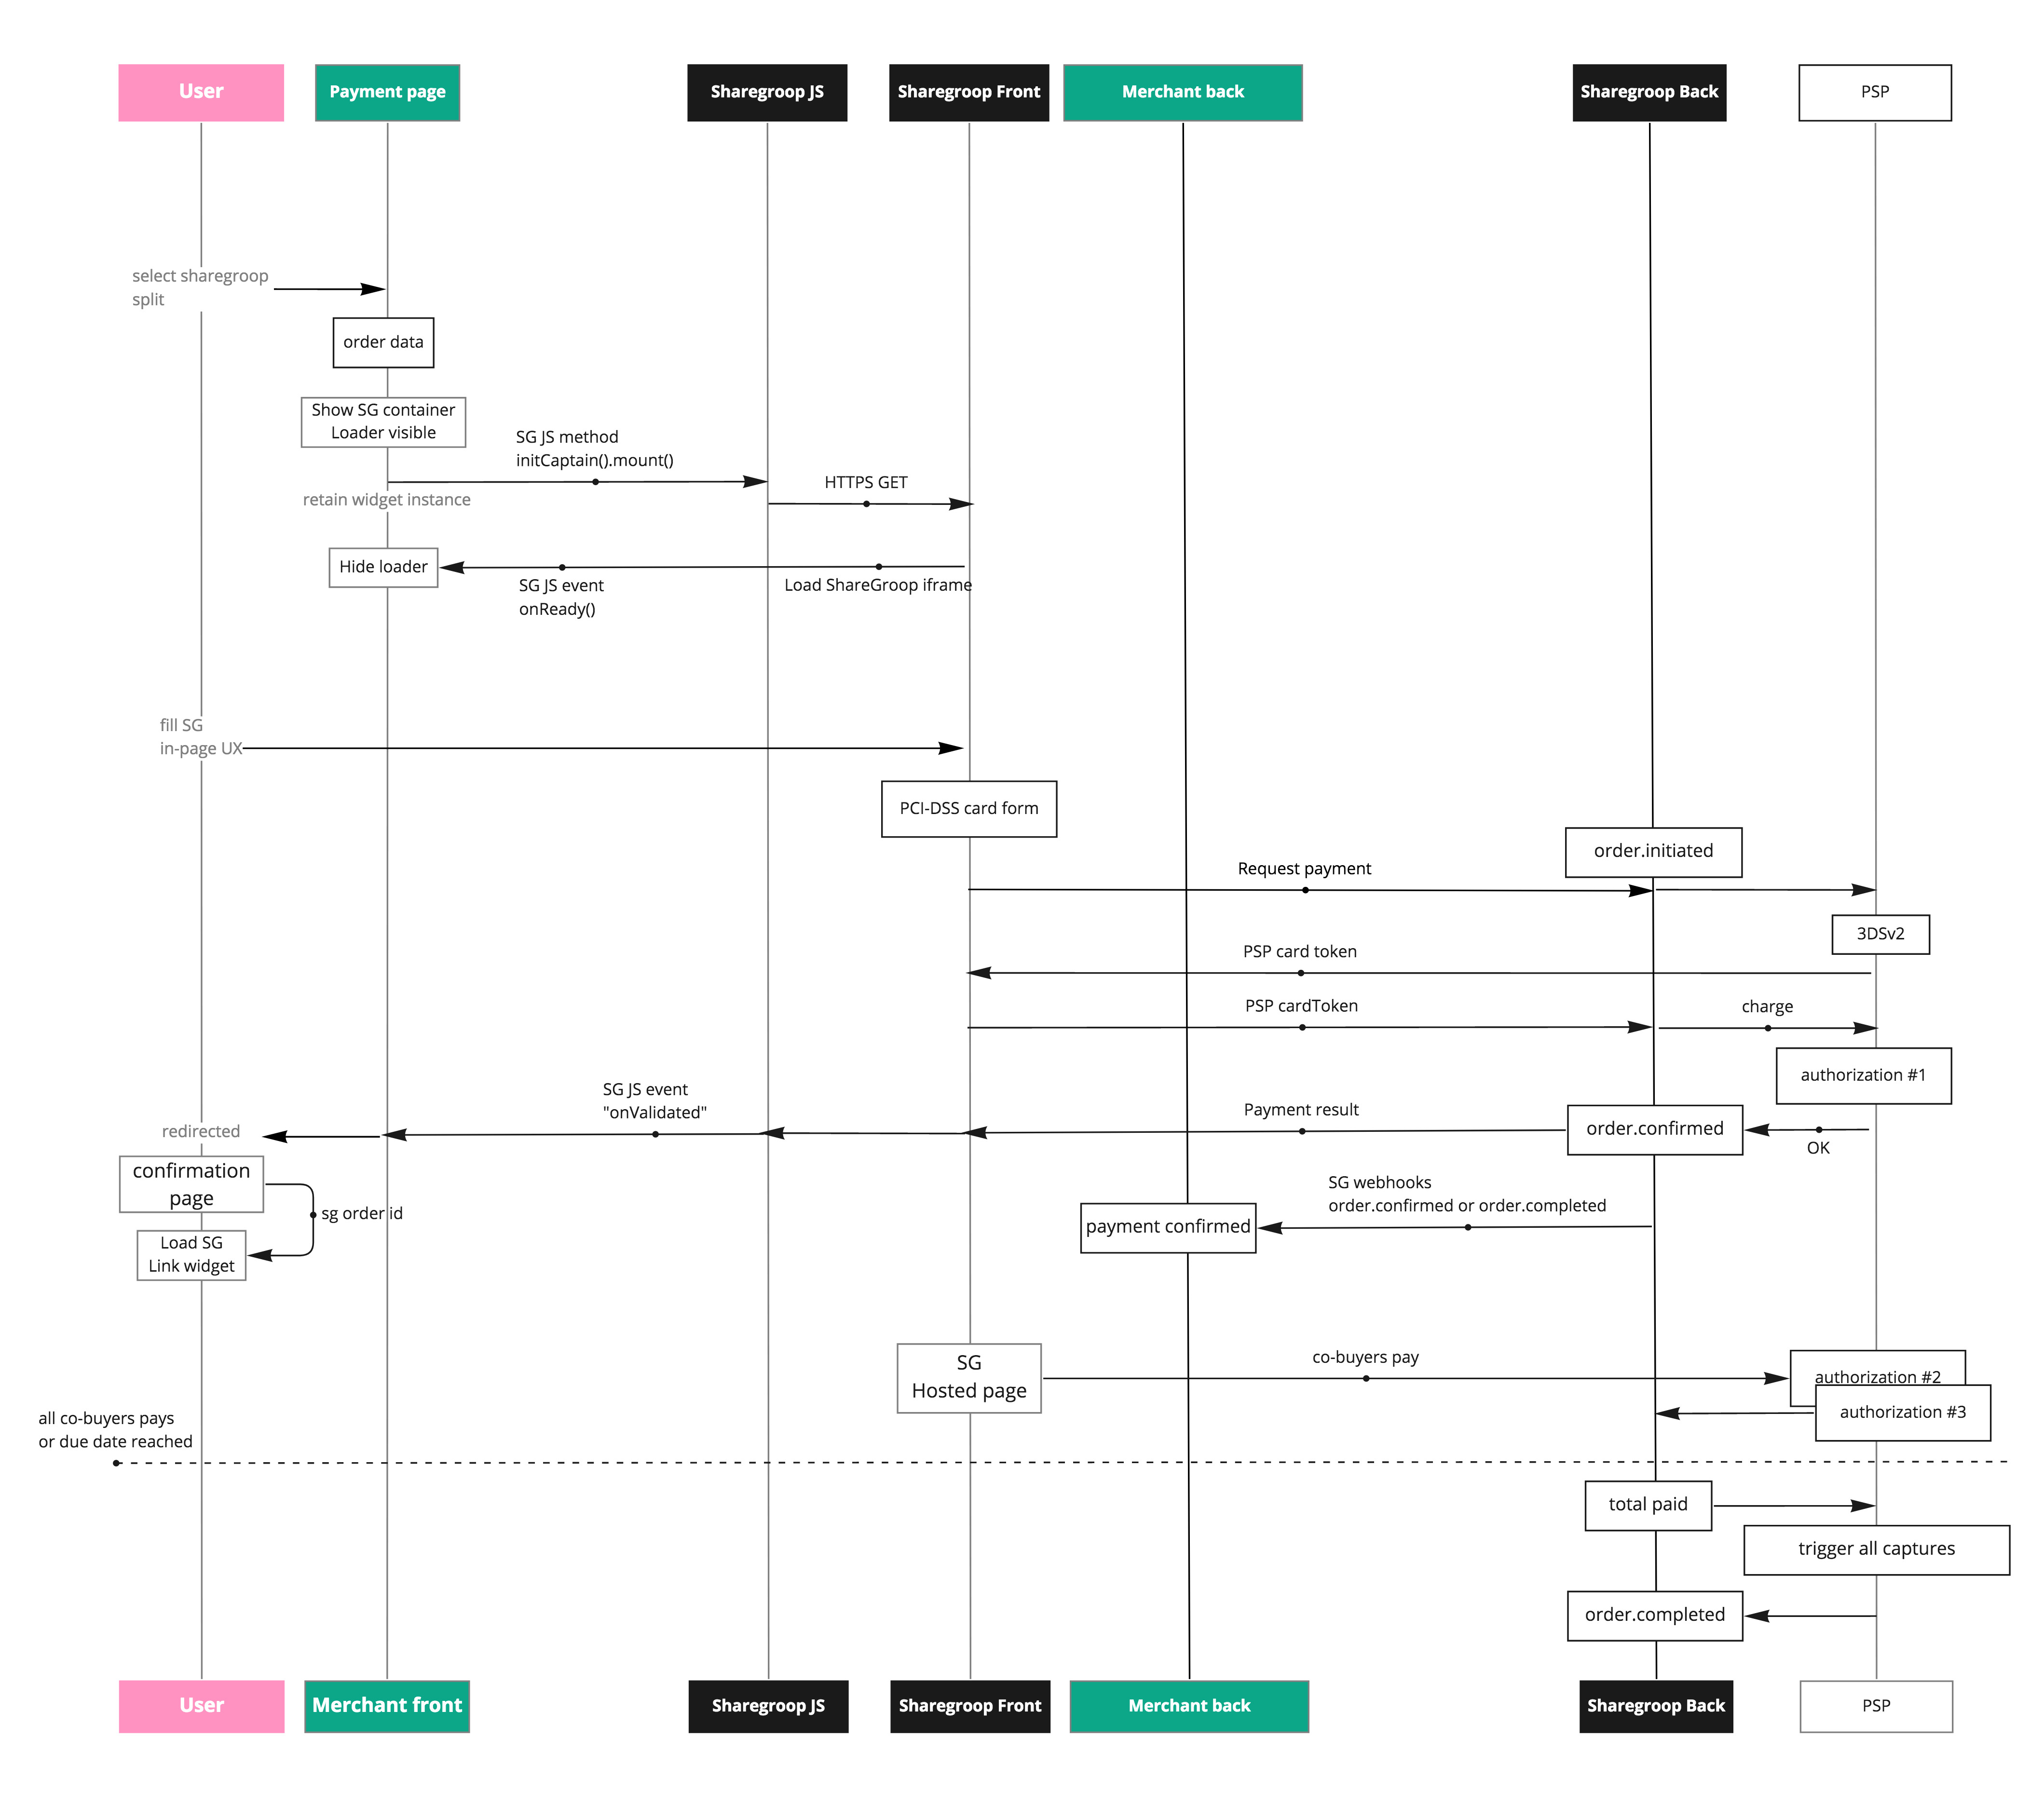
Split flow
The user chooses to share its order
As the Captain of the group, he initiate a split payment for his group by choosing the number of participant or directly the amount he wants to pay. An authorization is made on his card.
The Captain can then share a unique link to its group for its group to participate
From this link, each co-buyer chooses the amount of its participation and also pay on our secure hosted page
The sharing ends when the full amount is collected or the due date is reached
Below is a sequence diagram explaining of our Split module. It looks a little different than the single one because it focuses a little more on the User interactions.
Customizing the flow
The user flow can be adapted to your needs by simply tweaking the order config.
- The ux type gives you control over the end user sharing experience :
collect: the user specifies the amount they want to paypicking: the user selects products he want to pay, from the order items your provided
A
single + splitfeature is also availble : the user can choose to pay alone or to share the payment using one of the above split UX (Ask us for this platform level config). After payment, order will havesingleSplit:trueand the choosen ux value.
- The validation mode allows to control on the monetic flow (platform level config) :
direct(most use case) : full order amount is pre-auth on captain card; order is validated when full amount is collected or when due date is reached, missing amount are captured on captain pre-auth.standard: only the captain share is pre-authorized and the order is on hold; order is validated when full amount is collected or canceled on due date
Split integration
1. Create a Split order
Create a split order using your corresponding platform secret api key.
In addition to common required and optional parameters, there are few important modules split parameters :
ux | collect, pickingDefines the sharing user experience |
delay (or directly the dueDate)
|
The maximum date until co-buyers can pay (max = now + 6 days).
|
TIP
📖 The dueDate maximum can be overcome, but it involves a configuration to capture payments directly. It is usefull when doing a group payment while aggregating buyers over longer period of time.
In fact, we have more granular configurations possibles. Don't hesitate to contact us so we can figure out what would be the best flow for your business.
2. The Captain pays
Simply load our Captain component. Awaits the component event onValidated, and back-end check for order confirmation.
3. Then, what should I do on my side ?
mode
direct :
Well done 🎉 ! At this point, the ShareGroop order is still ongoing, waiting for co-buyers to pay, but your integration can just stop here. Since the full order amount has been authorized on the captain card, payment is guaranteed. So you can already finalize the order on your side.mode
standard :
At this point, the ShareGroop order is still ongoing, waiting for co-buyers to pay. The order will then be completed or canceled until the due date. You must wait for our Webhooks to finalize the order on your side.
4. What's next ?
Once captain payment and your internal order have been confirmed, you can then display the sharing link to your captain using our link component.
Note : the sharingLink will also be provided in the POST Order response.
"One link to rule them all !"
See what's next.
5. Co-buyers pay on the sharing space
Co-buyers arrive on a hosted page called the sharing space from the link. This is where they are able to participate.
The page shows relevant information such as the Captain in charge, his basket, the due date and the related platform.
Here, co-buyers can complete the sharing ux (ex: ux collect), and pay their share.
Multi cards
This module allows your buyer to pay a total amount using multiple cards.
This is very effective to overcome single card payment limits, spread expenses over accounts, and allocate personal and professional expenses.
Multi UX
Below screenshot shows a demo of the Multi UX widget embbed into a sample payment page (inside the container below "Pay with multiple cards").
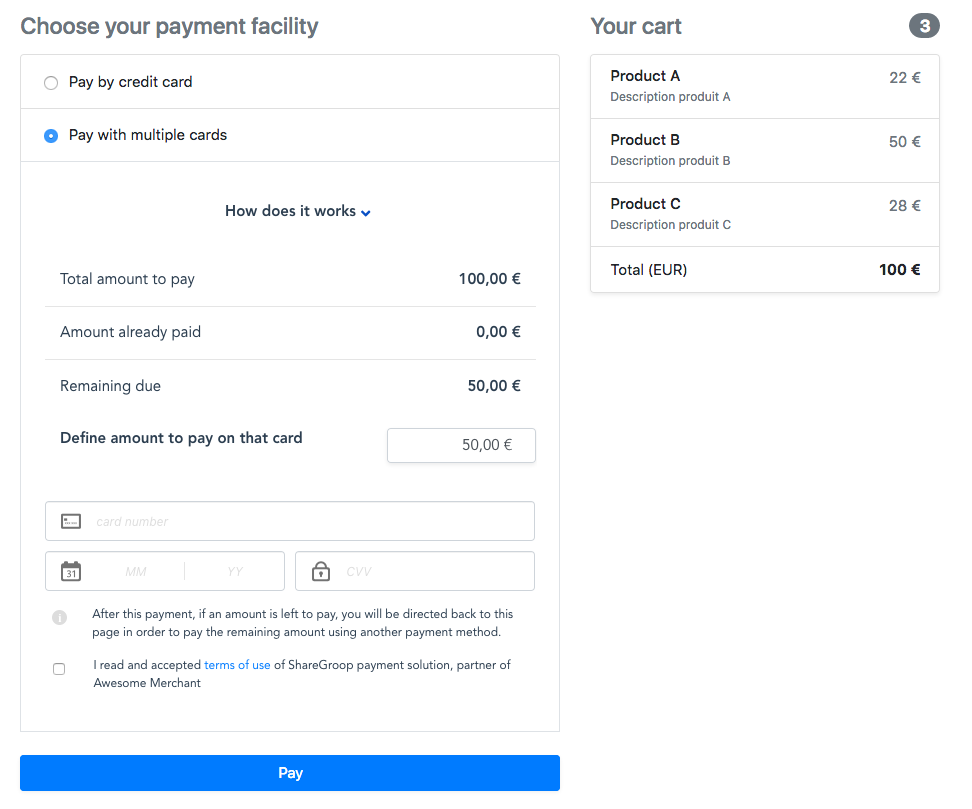
After a first payment, the user is informed about what he just paid. He is invited to pay the again. The amount remaining to pay is dynamicaly updated as he adjust the amount to pay on his card.
Multi flow
The user chooses to pay his order using multiples cards
He inputs the amount to pays on his cards. A 3DS authorization is made on his card.
The amount paid and remaining to pay are displayed, the user is invited to pay again (2.)
Once the full amount is authorized, the order is completed and the transactions will then be captured.
Same sequence diagram. Only differences are that there will be multiple transcations before we send your the confirmation. And we will only confirm to you the payments if the full amount is collected during the UX. So, you can considere that it acts as a regular single payment.
Multi integration
1. Create an order
Create an order using your corresponding platform secret api key.
The order will have order.ux: multi.
2. The buyers pays
Simply load our Captain component. Await the component event onValidated, and back-end check for order confirmation.
3. Then, what should I do on my side ?
Well done 🎉 ! At this point, the ShareGroop order is completed, your integration can just stop here. The full order amount has been authorized on the buyer cards, and captures will be triggered in a short. So you can safely finalize the order on your side.
4. What's next ?
See what's next.
ANCV Connect
ANCV Connnect / Chèque-Vacances Connect, is a popular french payment method allowing users to pay via their ANCV account via smart their phone.
- starting from 20€ (less is fully solded)
- for merchants in housing, travel, transport, fooding, culture & sports
- in france and for European union destination only
ShareGroop integration allows an easy integration of ANCV Connect, based on the same integration model as our other modules.
ANCV UX
Below screenshot shows a demo of the ANCV UX widget embbed into a sample payment page, configured to also accept complementary payment via bank card.
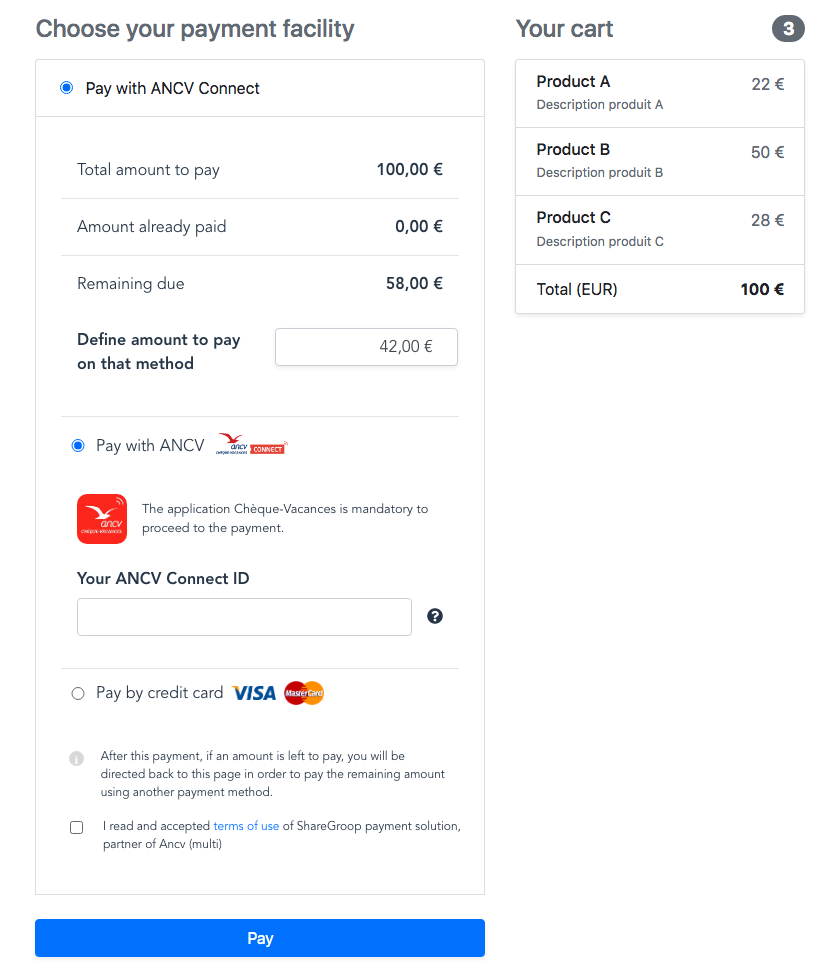
After a first payment, the user is informed about what he just paid. He is invited to pay the again by selecting a payment method for his next payment.
A stand-alone version of ANCV without complementary payment is also available if you wish to handle it outside sharegroop.
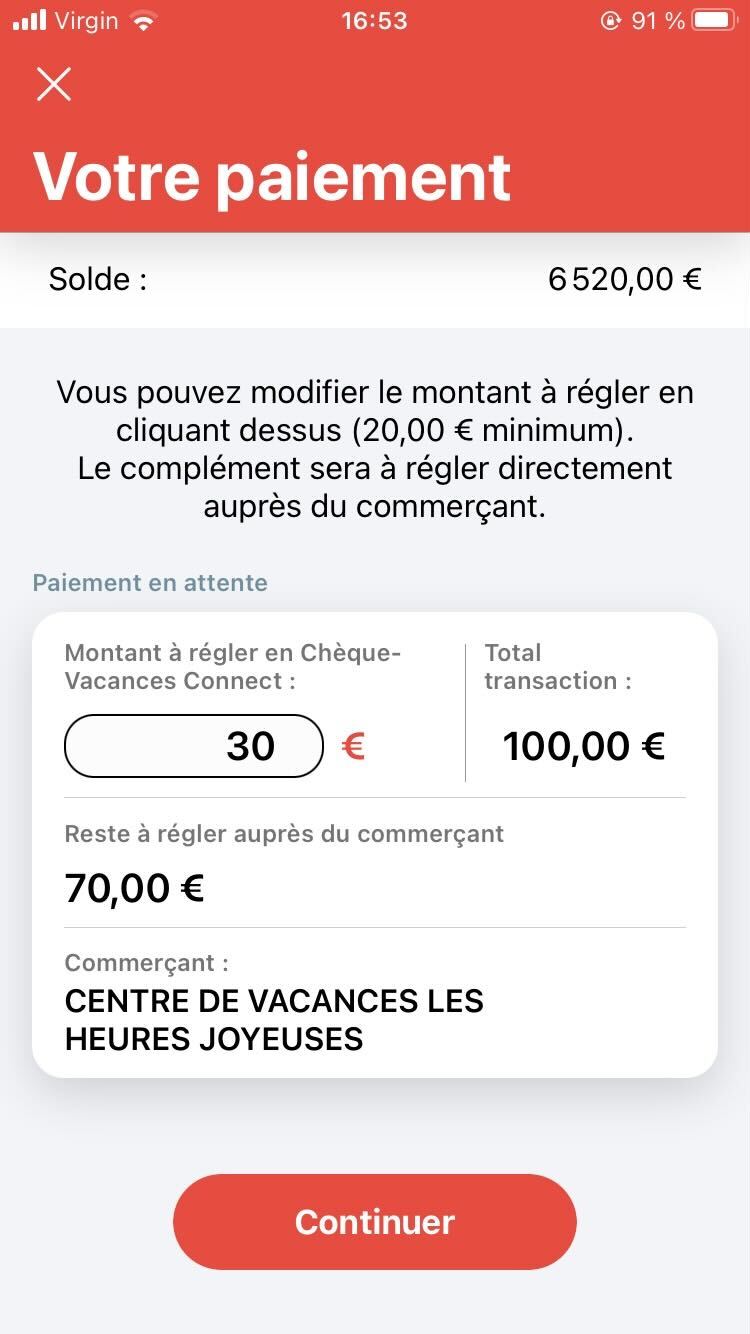
Here is what it looks like when the user confirms a payment in the ANCV User app :
ANCV flow
- The user choose to pay with ANCV on your payment page
- He is required to fill his ANCV login (email or Ancv ID)
- When he click on pay, the UX waits for ANCV payment confirmations
- A notification is sent on the user device having the ANCV app installed
- User validates the payment in his ANCV account through his app
- Our UX detects that the payment is confirmed and proceed to next steps (ux confirmation or next complementary payment, if any)
We also handle cases :
- where the payment confirmed by ANCV is different from the requested one
- minimum & remaning payment amounts cases (specificaly when we couple it with completary payment)
- the users tries multiple ANCV payments asynchronously
ANCV integration
This integration is identical to the module Multi.
For the stand-alone version, integration is identical to the module Single
Enabling ANCV payment is a matter of configuration. As ANCV Connect partner, ShareGroop has a dedicated ancv partner ID. And as merchant you had been on-boarded by ANCV as per the french regulation requires it to benefit this method. So you should have an ancv shopId. We need this value to configure your platform for ANCV Connect.
About the payouts : you will be getting paid you defined it with ANCV, directly on the bank IBAN your provided them.
Nevertheless, you will still find ANCV payments into our Reporting (paymentMethod column with the value ancv).
ANCV Testing
For end-to-end testing, you will need to install the ANCV test integration app following this guide.
For more convinience, we can provide you a test page with mocked ANCV payment confirmation taht simulates ANCV payments notifications, to avoid going through the test app for every test.
Pay later
This module allows your users to buy now and be debited at a defined date.
Pay later UX
Below screenshot shows a demo of the Pay later UX widget embbed into a sample payment page (inside the container below "Buy now, Pay later").
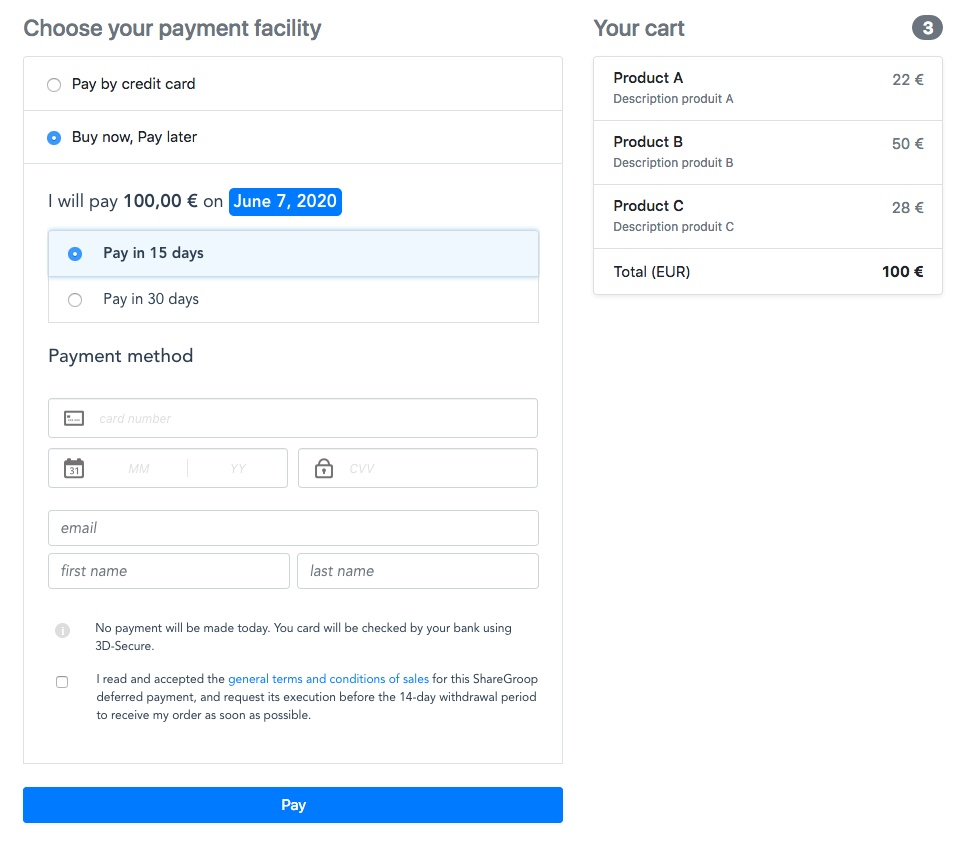
This UX is showing a platform configured to let the user choose, but it can be adapted; or forced to a specific payment date if you want to dissociate the display within your own payment page methods listing or if you only have 1 choice.
Pay later flow
The buyer chooses to buy now but pay later
The buyer will be offered to choose the payment delay himself (up to 30 days), if not directly specified by you. The deferred date of payment is clearly displayed. Additional missing information may be asked in the flow.
The buyer fills his card details and confirms. A 3DS authorization check is made on his card. A payment link is given in the confirmation email if he wants to complete the balance before the due date. If he gets rejected, we still offer other options instead (other due date, full-payment).
Your payment is funded. You can directly finalize the order on your side. The total amount is added to your next withdrawal.
The user will receive notifications approaching the actual payment date at which we proceed for capture.
Customizing the user flow
The user flow can be adapted to your needs by simply tweaking the order config :
You can specify the payment delay or due date directly during order creation, that will be presented to the user
Otherwise the user will be given the choice (ex: 15, 30 days), the due date will be calculated automatically
Pay later integration
1. Create a Pay later order
Create a Pay later order using your corresponding platform secret api key.
In addition to common required and optional parameters, there are few important modules pay later parameters :
delay (or directly the dueDate)
|
The date at which the buyer will be debited (max = now + 30 days).
|
| scoring data |
List of buyer information helping with buyer solvability scoring. See scoring |
The maximum due date can be more than 30 days without financing. Ask support@sharegroop.com.
The order will have order.ux: paylater.
2. The buyer confirms his purchase
Simply load our Captain component. Awaits the component event onValidated, and back-end check for order confirmation.
3. Then, what should I do on my side ?
Well done 🎉 ! At this point, the ShareGroop order is still ongoing. Your payment is funded so you can already finalize the order on your side. The total order amount will be counted in the next programmed withdrawal.
See what's next.
Note: Pay later can also works without financing options. If so, you dedice on maximum dueDate & booking workflow (ask success@sharegroop.com)
Installments
This module allows your buyer to pay :
- A total amount into several deadlines (3,4,10 with financing; X deadlines without financing)
- Advance/Balance payments
- Deferred payments (X deadlines with the first one deferred)
Installments UX
Below screenshot shows a demo of the Installments UX widget embbed into a sample payment page (inside the container below "Pay over time").
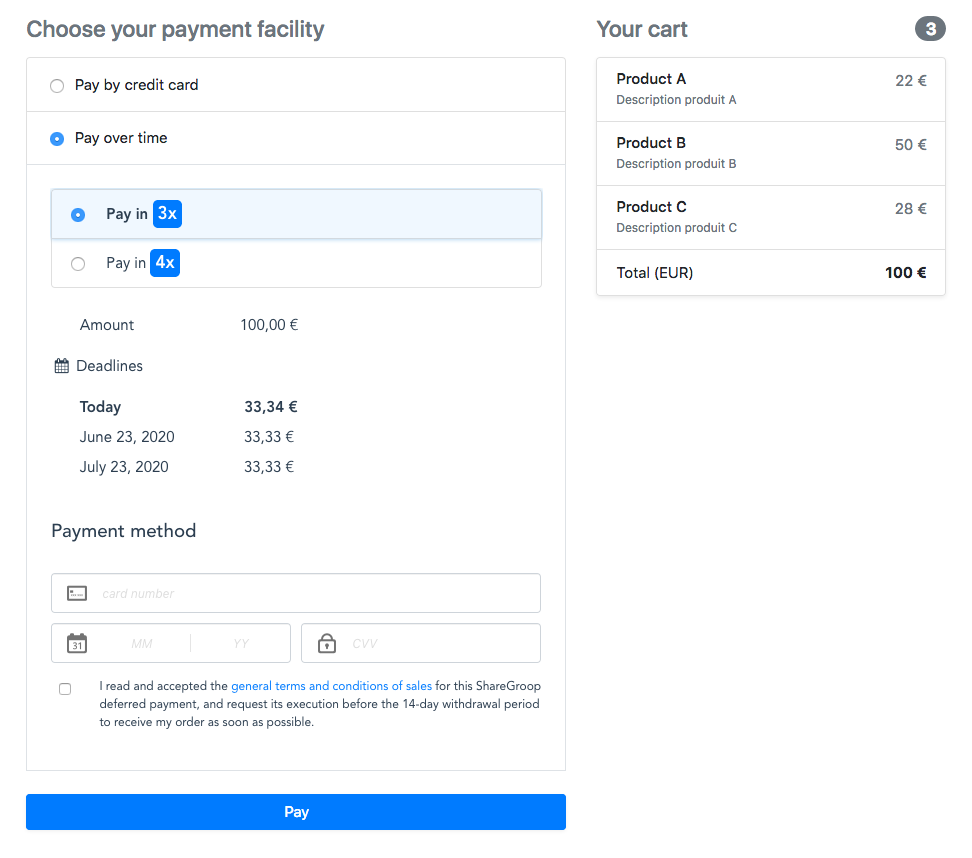
This UX is showing a platform configured to let the user choose, but it can be adapted; or forced to a specific payment date if you want to dissociate the display within your own payment page methods listing or if you only have 1 choice.
Installments flow
The buyer chooses to buy now and pays in several installments.
The buyer will be asked to choose the number of deadlines himself if not directly specified by you. Installments dates are clearly displayed. Additional missing information may be asked in the flow.
The buyer fills in his card details and confirms. A 3DS authorization is made on his card. If it gets rejected, we still offer alternative options instead (fewer deadlines, full payment).
Your payment is funded. You can directly finalize the order on your side. The total amount is added to your next withdrawal.
The user will receive notifications approaching due dates at which we proceed for captures.
Customizing the user flow
The user flow can be adapted to your needs by simply tweaking the order config :
You can specify the number of installments or dates directly during order creation, that will be presented to the user
Otherwise the user will be given the choice to select how many installments that suits him best by himself (due dates & amounts will be calculated automatically)
Installments integration
1. Create an Installments order
Create an installment order using your corresponding platform secret api key.
In addition to common required and optional parameters, there are few important modules installments parameters :
installmentsCount |
The number of installments. It will produce an evenly split amount and due dates installment list.
|
installments (without financing only)
| Or you can directly define each (uneven) due dates and amounts as below :
|
| Or you could also specify neither of them, so that you let your buyer choose what suits him the best : 3x, 4x etc.
This will :
| |
| scoring data |
With financing : list of buyer information required for solvability checks See scoring |
The order will have order.ux: installment.
Note: The order.dueDate will be set up from the latest installment's due date
2. The buyer confirms his purchase
Simply load our Captain component. Awaits the component event onValidated, and back-end check for order confirmation.
Card expiry prevention :
The expiry date of the card used to confirm the installment date must expired after the latest installment due date.
Installment complete balance :
When the order becomes confirmed, our confirmation email will contain a link to complete in advance the full remaining balance of the Order.
This link will also allow the user to follow his installments deadlines.
If you want to include it in your own email instead of using ours. You can simply find the link in
order.redirectUrl.
3. Then, what should I do on my side ?
First, you should see what's next.
At this point, the ShareGroop order is confirmed. And at each installment due date, payments will be attempted on the registered card.
With financing : your payment is also funded so you can already finalize the order on your side. The total order amount will be counted in the next programmed withdrawal.
You will be able to follow installments payment by GET /orders/{id} :
[
	{
		"id": "inst_ae5fd9d9-9914-4050-b645-dc785cfb6a9b",
		"amount": 2500,
		"dueDate": 1591005600000, // "2020-06-01" (e.g : now)
		"transactionId": "auth_e716610c-0a59-4ed2-8263-1480733c5dca",
		"status": "paid"
	},
	{
		"id": "inst_88e50842-d8be-487f-850c-1b5a0bee7ebc",
		"amount": 2500,
		"dueDate": 1593597600000, // "2020-07-01"
		"transactionId": "auth_310cc2bd-1873-4f43-8336-78a9839660a8",
		"status": "pending"
	},
	{
		"id": "inst_d2da8aca-dcc0-407c-b5de-2dea28216a21",
		"amount": 2500,
		"dueDate": 1596276000000, // "2020-08-01"
		"transactionId": "auth_e20f6b33-74d1-4963-b69a-7e54601bdfca",
		"status": "pending"
	},
	{
		"id": "inst_3343df87-1ec0-4589-a2fc-03f0d510e7f5",
		"amount": 2500,
		"dueDate": 1598954400000, // "2020-09-01"
		"transactionId": "auth_8fe0653d-289f-41d8-aa74-9b8a310bd0ce",
		"status": "pending"
	}
]
Installments status :
pending: installment is pending for a payment before itsdueDatepaid: installment has been paidunpaid: installment is considered unpaid when a due date has passed and the transaction has not been capturedcanceled: installment become canceled if you call refund (full or partiall refund) on the order, and the concerned installment was not already paid
Each installment has a transaction linked to it, reprensenting the pending payment. You can get more details about transactions using GET /orders/{id}/transactions, or GET /transactions/{id}.
Installments recovery
We can set up your platform with automatic payments recovery.
Automatically
Two mechanisms can be used :
1 - Automatic unpaid retries
When a scheduled payment failed at a due date, automatic payment attempt can be performed on the concerned Order. It is particularely useful to automatically clear cases where the customer had not enough money at the time of the payment attempt (ex: at the end of the month).
Retry behavior can be set up on your platform as follow :
retry every interval retry until count // the maximum retries until it stops
Example behavior : Attempt retry every 1 days until 7 days
If the payment retry succeed, the transaction will be captured, and installment becomes paid.
2 - Automatic recovery payment link notification
You platform can also be configured so that an email is sent to the customer upon installment payment failure.
This email contains a link to a hosted page targeting the unpaid transaction, where the customer can observe his installment summary and choose to pay the unpaid installment with another method.
After completing the payment, the transaction will be captured, and installment becomes paid.
TIP
- Recovery configurations are only available at platform level configuration. Ask support@sharegroop.com.
- Recovery features are controled directly by ShareGroop when you use Installments with financing option.
Manually
- When an scheduled installment payment attempt failed, you can be notified via webhooks of
installment.unpaidfor your system to react as your want - You could then provide the recovery link directly to your customer, composed as such : https://split.sandbox.sharegroop.com/{transactionId} (remove
.sandboxfor production url), using the unpaidtransaction.id. This link is also available in the dashboard, on transaction details. - Or you can ask your customer to pay on the "complete balance link" directly
Note - When the user complete the balance at once (using the link provided in the installment confirmation email) :
- it will create a new transaction of the remaining balance in the order
- the order becomes
completed - the already existing other pending transactions will not be used anymore. Meaning, the
order.installments[]linked to those transactions will not be marked as paid in this case.
Installments cancellations
When it comes to cancel and refunds payments from an Installments, several use cases are handled for you by ShareGroop.
When you want to cancel an Installments :
- totally : you should call POST /orders/{id}/refund
- partially : you should call POST /orders/{id}/refund with a lower
amountthan the initialorder.amount
Multiple partial refunds can be called on the same Order
We will cancel installments from last to first, until we reach the amount you specified (if any)
capturedtransactions will berefundedorrefundedPartialpendingtransactions will bevoidedor updated with a reduced pending amount
This is the easiest way to manage the cases defined below, with only 1 API call.
Indeed, your installments advancement can be in various states depending on when you call for cancellations.
Lets say we have an Order at 100,00 €, 3 installments over 3 months,
Case 1 : Order has just been confirmed
Before : first installment has been paid, 2 left pending
| # | amount | installment | transaction |
|---|---|---|---|
| 1 | 33,34 | paid | captured |
| 2 | 33,33 | pending | pendingAuthorization |
| 3 | 33,33 | pending | pendingAuthorization |
If I want to cancel & refund totally
1-a. After refund with no amount specified
| # | amount | installment | transaction |
|---|---|---|---|
| 1 | 33,34 | paid | refunded |
| 2 | 33,33 | canceled | voided |
| 3 | 33,33 | canceled | voided |
- n°1 stays in
paidbecause it has indeed been paid. However, the transaction has been refunded to the user. - n°2 & 3 are
canceledbecause they no longer awaits for a payment. Pending transactions have been voided.
If I want to cancel & refund partially
1-b. After refund with amount 33,33€ :
| # | amount | installment | transaction |
|---|---|---|---|
| 1 | 33,34 | paid | captured |
| 2 | 33,33 | pending | pendingAuthorization |
| 3 | 33,33 | canceled | voided |
1-c. After refund with amount 50,00€ :
| # | amount | installment | transaction |
|---|---|---|---|
| 1 | 33,34 | paid | captured |
| 2 | 16,66 | pending | pendingAuthorization (16,66 will be captured instead of 33,33) |
| 3 | 33,33 | canceled | voided |
1-d. After refund, amount 80,00€ :
| # | amount | installment | transaction |
|---|---|---|---|
| 1 | 33,34 | paid | refundedPartial (captured: 33,34; refunded: 13,34) |
| 2 | 33,33 | canceled | voided |
| 3 | 33,33 | canceled | voided |
Case 2 : Order is confirmed
Before : first and second installments have been paid, 1 left pending
| # | amount | installment | transaction |
|---|---|---|---|
| 1 | 33,34 | paid | captured |
| 2 | 33,33 | paid | captured |
| 3 | 33,33 | pending | pendingAuthorization |
If I want to cancel & refund totally
2-a. After refund with no amount specified
| # | amount | installment | transaction |
|---|---|---|---|
| 1 | 33,34 | paid | refunded |
| 2 | 33,33 | paid | refunded |
| 3 | 33,33 | canceled | voided |
If I want to cancel & refund partially
2-b. After refund with amount 33,33€ :
| # | amount | installment | transaction |
|---|---|---|---|
| 1 | 33,34 | paid | captured |
| 2 | 33,33 | paid | captured |
| 3 | 33,33 | canceled | voided |
2-c. After refund with amount 50,00€ :
| # | amount | installment | transaction |
|---|---|---|---|
| 1 | 33,34 | paid | captured |
| 2 | 33,33 | paid | captured (captured: 33,33; refunded: 16,66) |
| 3 | 33,33 | canceled | voided |
2-d. After refund with amount 80,00€ :
| # | amount | installment | transaction |
|---|---|---|---|
| 1 | 33,34 | paid | refundedPartial (captured: 33,34; refunded: 13,34) |
| 2 | 33,33 | paid | refunded |
| 3 | 33,33 | canceled | voided |
Case 3 : Order is completed, all installments paid
Before :
| # | amount | installment | transaction |
|---|---|---|---|
| 1 | 33,34 | paid | captured |
| 2 | 33,33 | paid | captured |
| 3 | 33,33 | paid | captured |
After : same as above, all installments stays in paid, and all transactions refunded fully.
Alternatively, you can also manage refunds yourself directly on Transactions :
- call our Transactions API POST /transactions/{id}/refund
- from our Dashboard, on the Transactions details by clicking on "refund" button
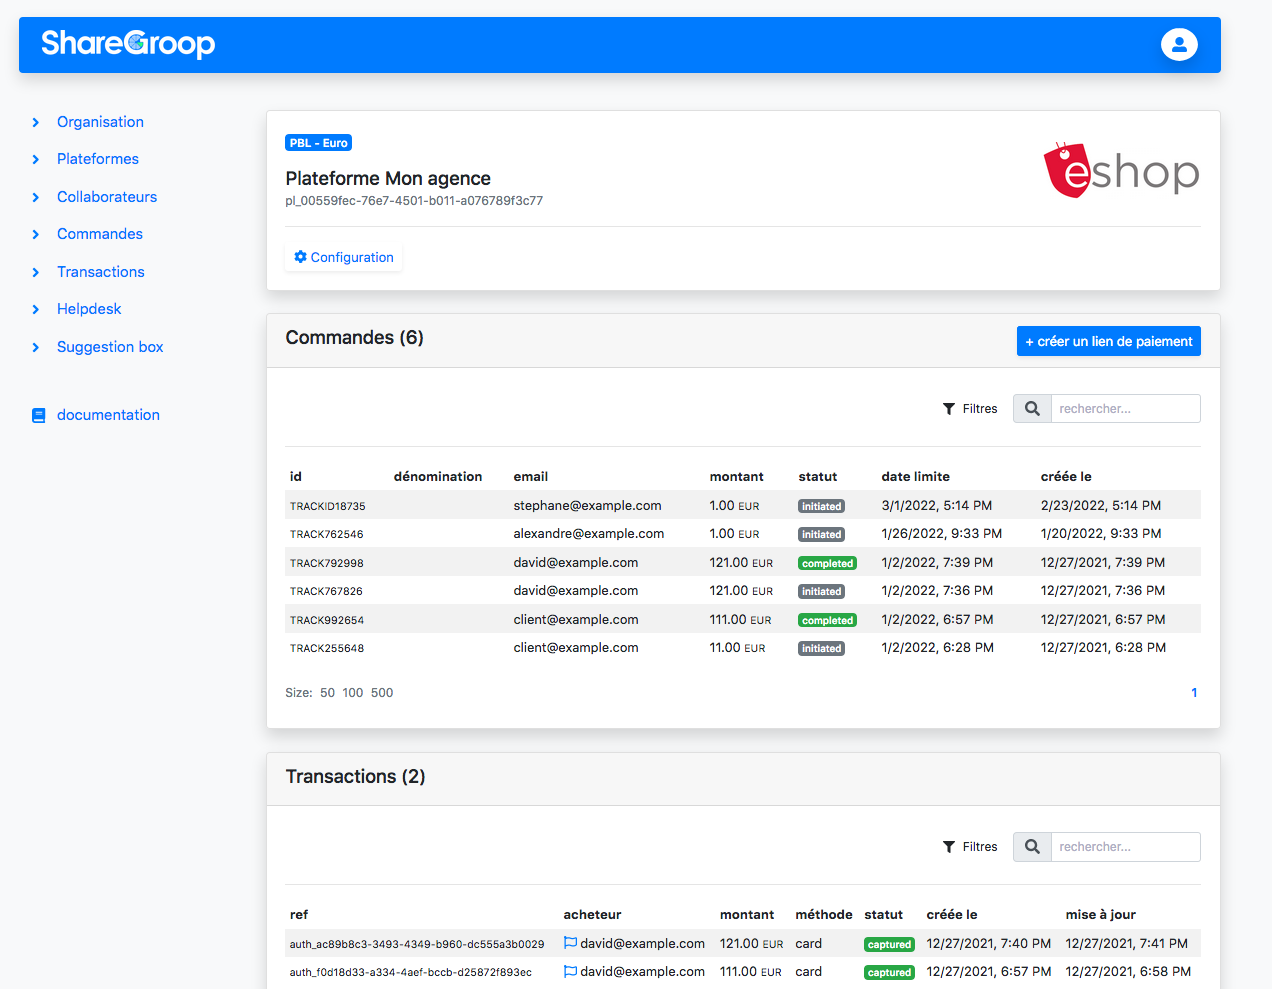
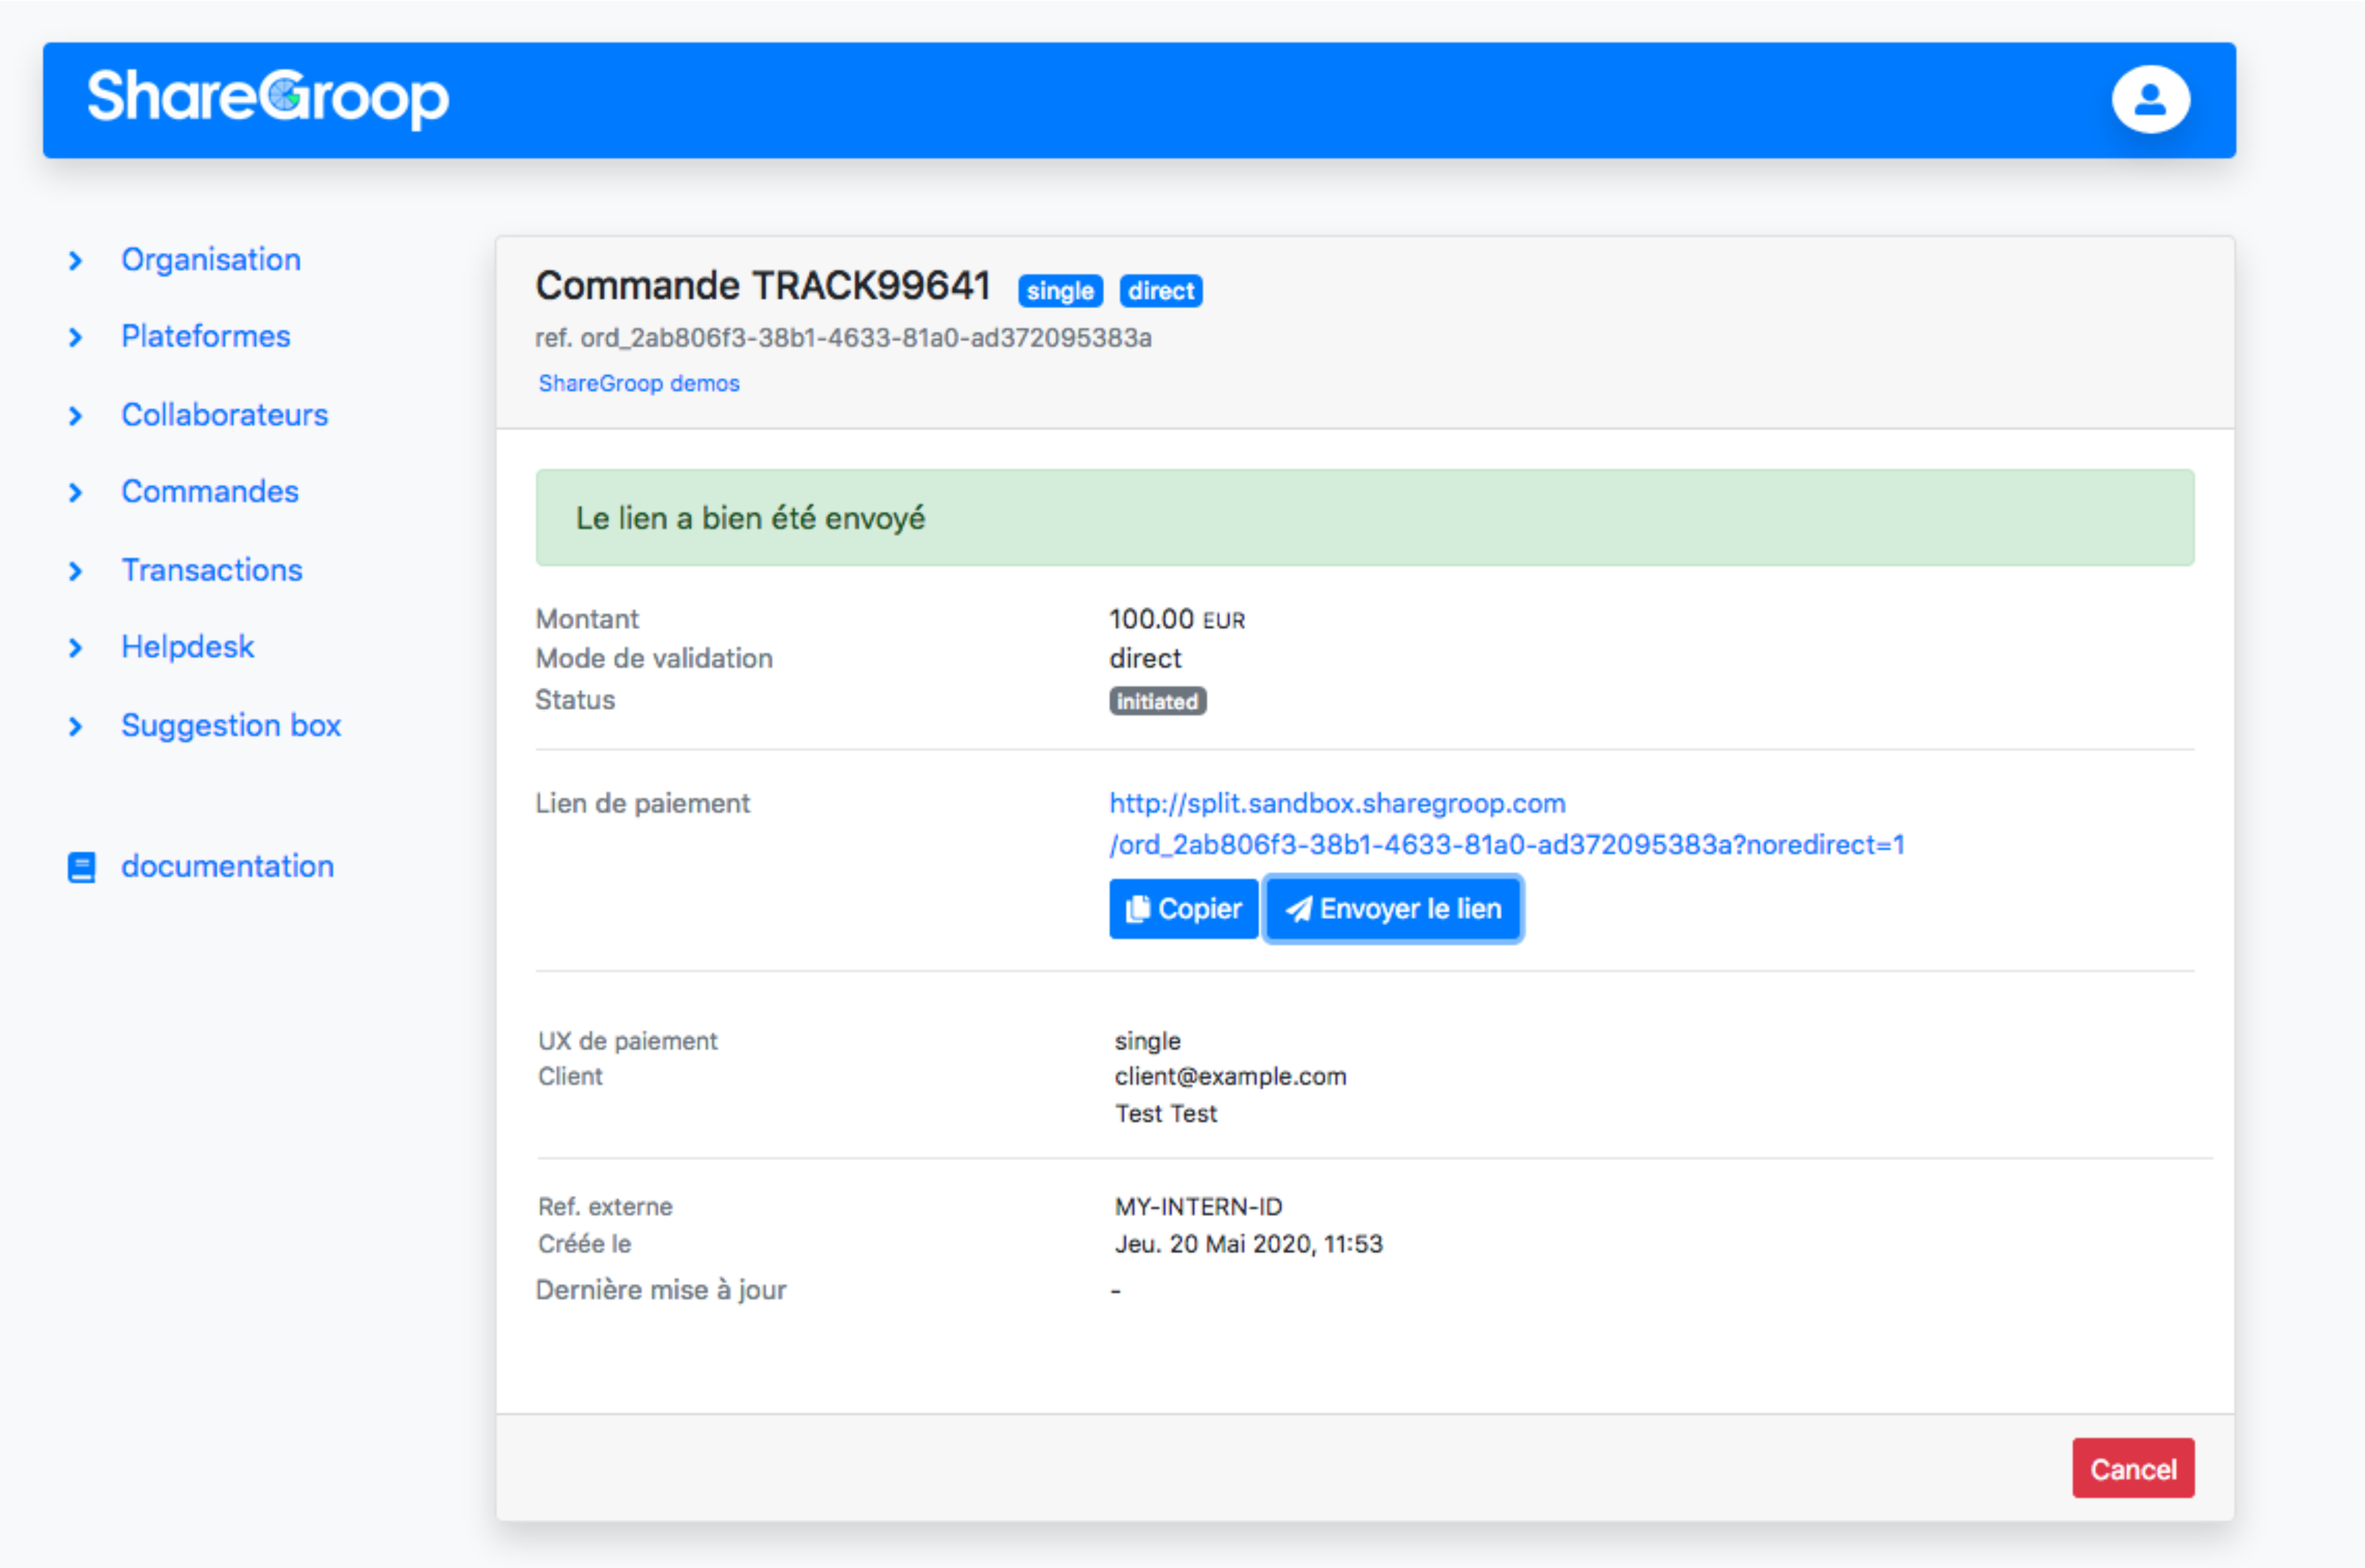
Pay By Link
Pay by link is a feature that allows you to create a payment link, and directly send it to your customers via email or sms.
Pay By Link flow
- You create an order via API or Dashboard
- You can choose to send it or retrieve the payment link
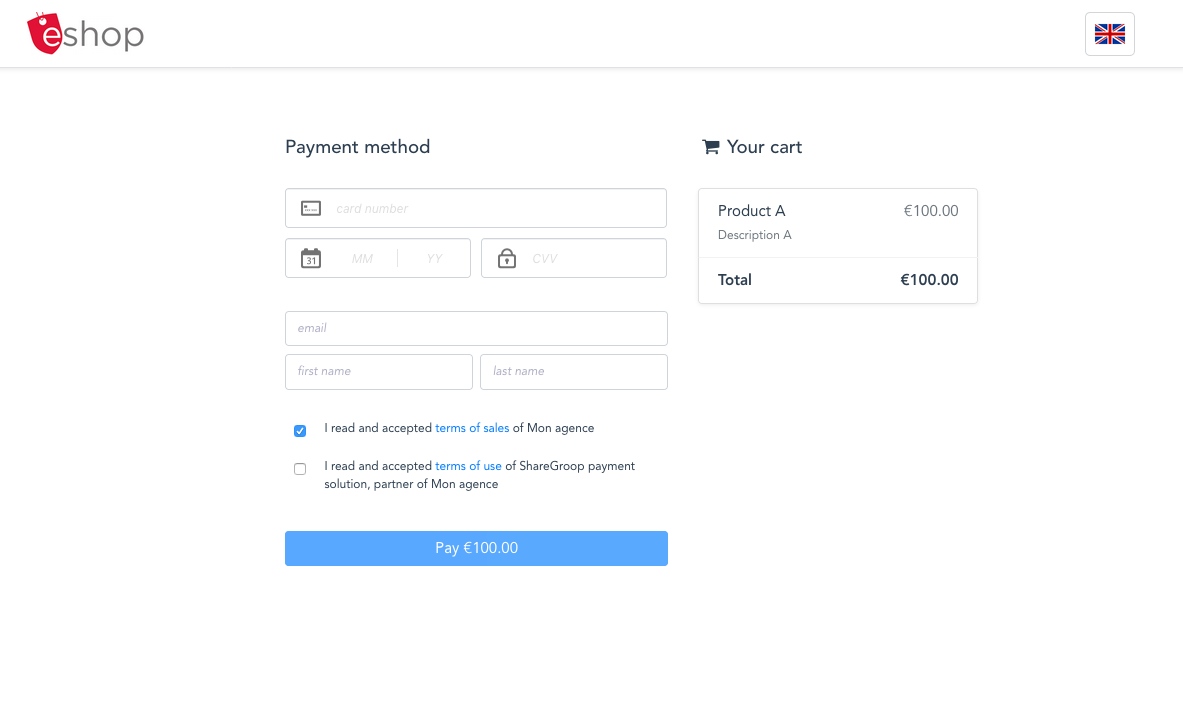
- Your user pays on a secure hosted page matching the module UX your created the link for
- You can follow the payment on your dashboard and get notified via webhooks
Pay By Link integration
The pay by link feature allows you to send a payment link for any module listed above.
Via API :
- Create and order as usual by specifying module related data : such as the amount, your reference, and items composing the total amount to pay.
- You can retrieve the payment from
order.redirectUrland send it to your customers - You can also programmatically send email or SMS by specifying
sendLinkConfigparameters during the creation
Via Dashboard :
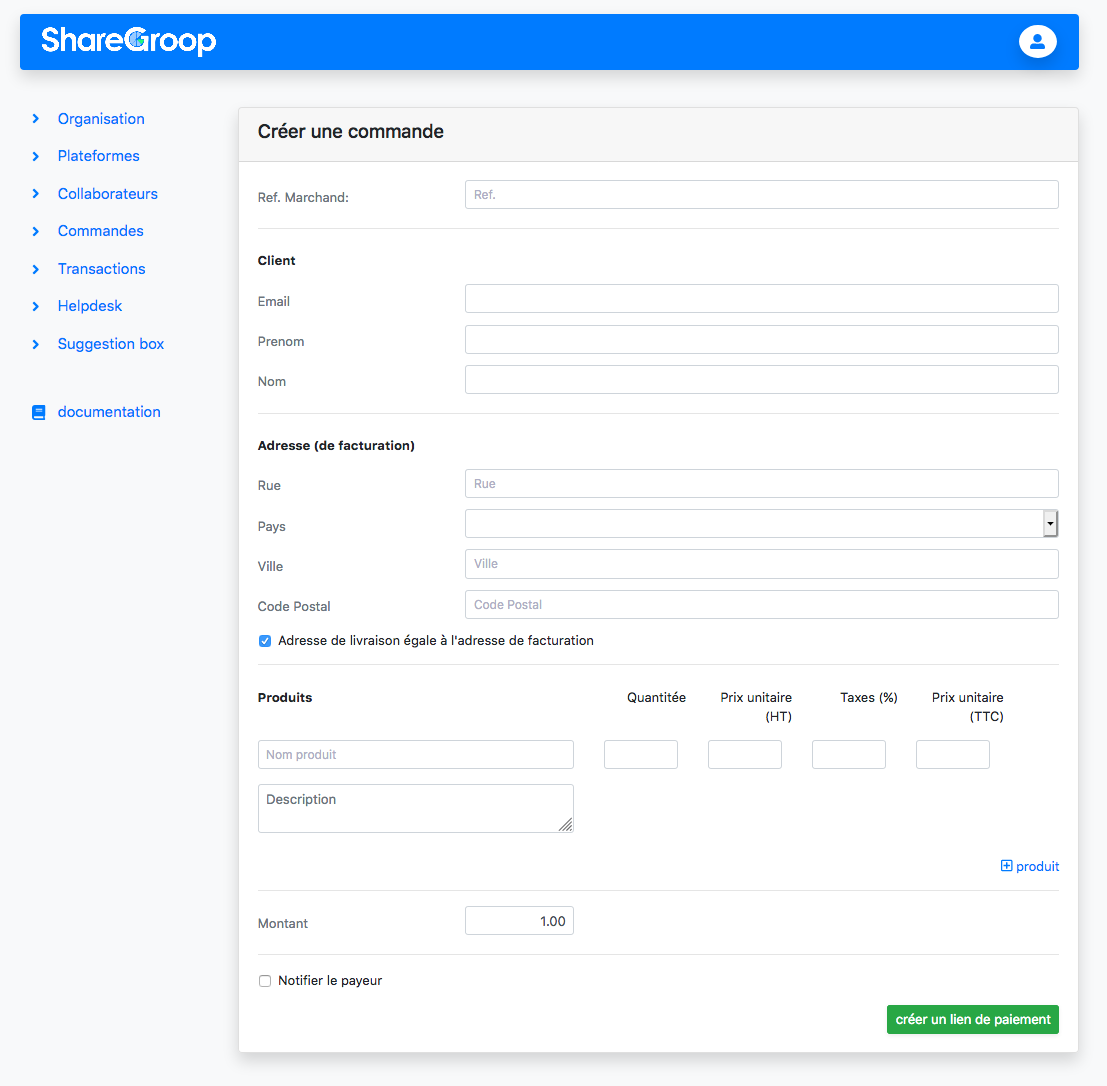
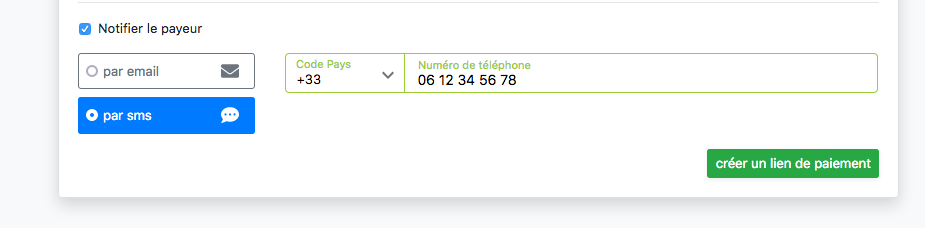
- You can also create payment link directly on your platform as shown below
- You can also decide to send email or sms payment notification on a previous created order directly from the dashboard order view
1 - On your pay by link module plateform, create on "+ Create a payment link" button.
2 - Fill the form
3 - Choose whether or not to directly send the payment link to the customer
4 - Your customer pays on our hosted page (depending on the module UX)
5 - Follow the payment
- Get payment notification using our webhooks : await the event
order.confirmed,order.completed, or eventransaction.captured - You can follow it from your Dashboard order view
Recurring payments
Tokenize method
When a customer pays, we save its payment method repesentation as a Token.
If you desire to save the customer payment method,
- During the first payment request (order creation), add
order.tokenize: true - When the user complete the UX (from you widget or our hosted page), we will perform a reusable tokenization that will be saved into the Customer :
'customer' : {
	'id': "cst_...",
	'methods': [
		{
			id: 'cpm_...',
			token: 'tok_...',
			method: 'card',
			card: {
				bin: "424242",
                expiryMonth: "09",
                expiryYear: "2024",
                last4: "4242",
                paymentMethod: "Visa"
			},
			default: true // newest saved one will be set as default
		}
	],
	...
}
Reuse method
You can then attempt payment on the tokenized customer method using POST /orders, with :
customerId: cst_...: the customer you want the payment to be made on (will use the default method).debitAuto: true: to ask for the automatic payment attempt on customer method
Subscriptions
Subscription helps you collect payments automatically :
- you can define its payment schedule
- you can define the subscription amount and/or subscription items (link to your Product or not)
- optionally attach a Customer
- make the user pays the first time start the Subscription link or automatically trigger debit on existing customers
- failed payment notification & recovery can also be set up
- update the registered card on our update link
- Subscriptions can also be used to emmit payment requests instead of automatic debit
Basics
- You create a Subscription using our API or Dashboard
- When the subscription schedule starts (now, or deferred later depending on the schedule
startAt) it will create anInvoice(opened) representing the amount due for the current subscription cycle. - The first
Invoicewill bepaidby the user :- either via a notified payment link (email, sms), or automatically if you specified
debitAutoon the subscription. - you can retrieve the payment link in
subscription.lastInvoicePaymentLink
- either via a notified payment link (email, sms), or automatically if you specified
- At this point you have :
- an
Orderthat iscompleted: representing the payment (with itsTransactionscaptured) - linked to the
Invoicenowpaid - attached to the
Subscriptionnowactive
- an
- You can then follow your customers subscriptions via the Dashboard or API
- At each subscription cycle (
subscription.cycleRank: 1, 2 etc..) :- a new
Invoicewill be created - and automatic debit will be attempted on the tokenized method (from the attached
Customer, or saved from the first subscription cycle)
- a new
Subscription management
You can manage Subscriptions directly with below object via API, or Dashboard :
- to update its pricing
- to update its items
- to update its schedule (change the period, interval, end the subscription)
subscription: {
    id: 'sub_...',
    customerId : 'cst_...', // the user that has subscribed
    status: 'initiated', // ['initiated', 'active', 'unpaid', 'canceled', 'ended']
    amount: 10000, // the subscription amount that will be debited to the Customer
    schedule: { // inital schedule, or the one you updated
        startAt: timestamp, // if <= now : starts now, if >= now : will start later
        endAt: timestamp, // leave unset if unlimited
        period: 'monthly', // [daily, monthly, yearly]
        interval: 1 // the interval between cycle
    },
    cycleRank: 1 // the current cycle position
    items: [ // subscribed product or service, or the one you updated
        ...
    ],
    createdAt: timestamp,
    ...
}
Understanding the amount to be paid :
The amount to be paid by the user on the cycle will be sourced from subscription.amount.
The amount to be paid by the user on each subsequent cycle will be either sourced :
- from the sum of
subscription.itemshavingitems[].subscriptiondefined (to basicaly say "this item is to be counted in cycles") - otherwise, from
subscription.amount, if no items defined, or no items are marked for subscription
This way, you can handle the case where you want a product to only be counted the first time (such as initial additional fees).
Products & Subscription's items :
You can create subscription without any information on items.
But if you want to specify the goods or services of the subscription, you can simply define subscription.items[] as follows :
"items": [ // array of item object
    { // an item object
        "name": "item A", // item name
        "amount": 1000, // the total item value (usualy : your result of your unit price x quantity, including tax if any)
        "quantity": 1, // optional, default to 1
        "description": "Monthly service A", // optional item description
        "trackId": "your-internal-id" // optional, your internal reference as usual
    },
    ...
],
Moreover, if you use Products resource as well, created via API as explained here or Dashboard, you can also do :
"items": [
    { // an item object
        "productId": "prd_..." // id of the product
    },
    ...
],
It will copy the Product data directly into the item (for keys/value you did not already provide directly on the item).
It means that you can update a Subscription individually, and update your Products without affecting subscription already accepted by buyers.
Usually you use this implementation when you defined your Product catalog, and your Products are defined as Subscription Product.
Subscription Products have product.subscription: {period: ..., inteval: ...}
So, to wrap this up :
- you can define items just for information
- you can define items by sourcing data from a Product you linked using
item.productId(and still override item values) - you can separate one-off items (not having
item.subscription) from the ones that should be counted after the first cycle (havingitem.subscription)
Customer & Subscription :
If you want to attach a subscription to an existing Customer you created via API or Dashboard, you can simply create the subscription with the a subscription.customerId.
It will copy the Customer's information - email, firstName, addresses - if any, directly on the subscription - if not already provided on the subscription.
If you want to avoid an existing customer to pay the first cycle, specify subscription.debitAuto:true. Payment will be attempted directly on the customer default method, if any.
When an automatic payments fail, the concerned Invoice will become unpaid, the Subscription will also become unpaid (see below subcription recovery)
Subscription recovery
Automatically
We can set up your platform with automatic recovery.
Different mechanisms can be used :
1 - Automatic payment retries
To help lowering unpaid Invoices, when a scheduled payment failed at a due date, automatic payment attempt can be performed on the concerned Invoice's Order (auto created with the invoice).
Retry behavior can be set up as follows :
- retry every
interval// interval between retries - retry until
count// the maximum retries until it stops
Example behavior : Attempt retry every 1 days until 7 days
- After each attempt : we send webhook
invoice.unpaidandsubscription.unpaid - Once every of our auto-recovery attempts failed for a given Invoice : we send webhook
invoice.recoveryFailedso you can act on it
2 - Automatic recovery payment link notification
Your platform can also be configured so that an email is sent to the customer upon payment attempts failure, in which we notify the customer for the missing Invoice payment.
After completing the missing payment, as part of the subscription, his default method will be updated with the latest one used successfully.
3 - Card expiry prevention
This feature allow us to detect card upcoming expiration based on the tokenized card expiry date (mm/yy).
If the card expires before the next subscription cycle, we can notify the customer with a link for him to update his payment method. This way, the user can update his payment method for the next scheduled attempt. Thus, avoiding ending-up into payment recovery.
4 - Manually
- When a subscription payment failed after scheduled payment date, you are notified via webhook of
subscription.unpaidfor your system to react as your want - You could then fetch the unpaid latest Order payment link generated by the subscription (
order.redirectUrl), and send it to the user
Virtual IBAN
This module allows your buyer to pay on a unique SEPA Virtual IBAN number generated for and associated to your order.
Virtual UX
Below screenshot shows a demo of the vIban UX widget embedded into a sample confirmation page.
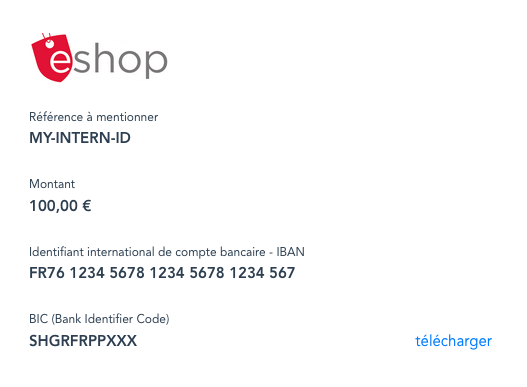
Virtual IBAN flow
The user chooses to pay his order using a virtual IBAN, let him confirm the payment step.
From you back-end, create an order, save the id, and put your order on hold for payment.
On the confirmation page, load the widget (that displays the virtual IBAN information and expected amount to pay).
The user then adds this IBAN as a beneficiary to his bank account and triggers a transfer of the awaited amount.
Once the full amount has been received, the order is completed. You are notified via our webhooks so you can act on it.
Note : we will also send an email containing the iban so that the user can't miss it.
Virtual IBAN integration
1. Create a virtual IBAN order
Create an order using your corresponding platform secret api key.
Only common order parameters are required.
See our virtual IBAN OpenAPI 3 Specifications - also exposing a simulation endpoint to trigger a payment on a virtual iban so you can test your integration.
2. Display the virtual IBAN to your user :
Simply load our Captain component.
He will be presented the virtual IBAN information and the reference to mention : your order.trackId.
3. Then, what else ?
Your order is status: pending, awaiting for the virtual IBAN payment.
The user then triggers a payment on this IBAN from his bank account.
As soon as the payment is received, your order becomes completed and you will be notified via webhooks
Note : We also handle this module's inherent edge-cases (e.g : a user pays too much), for which you can receive additional events. Ask support@sharegroop.com.
Hanle reconciliation using our Reporting, containing both yours and our references.
Bank transfer initiation
This payment facility allows your user to pay you directly using their bank account, without the need to do it manually.
Bank Transfer initiation flow
- The user select his bank
- He will be asked to authenticate (SCA) into the bank login webpage or via his bank app
- He will be prompted to confirm the bank transfer for a given amount & reference to your merchant account, and confirms it
- User will then be redirected back to our page for few seconds while we await for his bank to confirmation the initiation
- If it is successful, the user is redirected to confirmation page; otherwise we display an error and allow him to retry
You can check the detailed workflow in this diagram
Bank Transfer initiation integration
1. Create an Order for bank transfer initiation
Create an order for instant payment using your corresponding platform secret api key.
You should specify your transfer reference into order.trackId parameter.
2. Redirect the user to the payment page, or load it into our widget
Simply load our Captain component with the order id. Or redirect him to the url given at creation : order.redirectUrl (you can directly share this url in your own notification channels)
The user will proceed to the payment initiation flow.
If you want to redirect your user to your page after the experience, specify order.successUrl
3. Receive our webhook notification
When the bank confirms the payment initiation, you will receive a webhook order.completed, so you can confirm the payment on your side.
At this point, the initiation request has passed validation checks and has been accepted by the Institution. Settlement is expected to happen in due course (for SEPA Instant payment, it is usually completed within 10 seconds)
Note: while combining this feature with our Virtual Iban, you will be able to be notified from both initiation, but also of the reception of the bank transfer
SEPA Direct Debit
This payment method allows your user to give you permission for collecting payment via SEPA bank transfer.
SDD UX
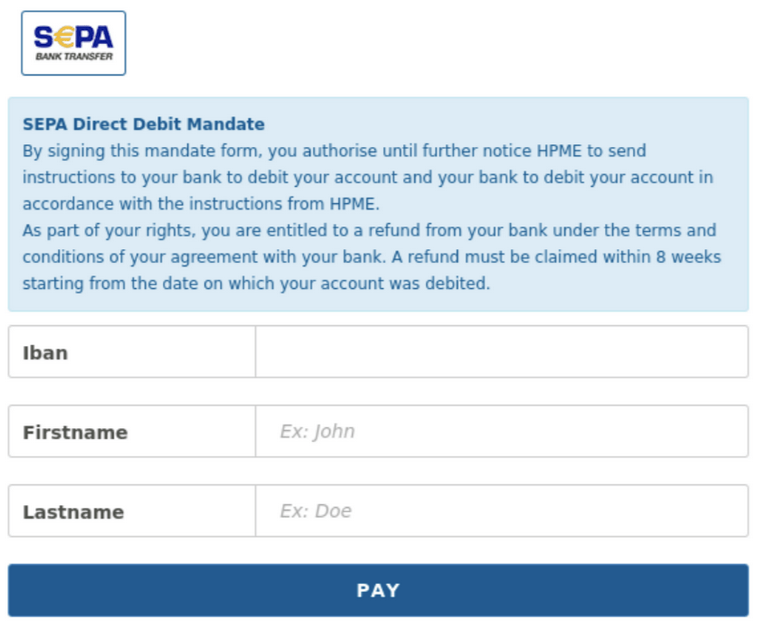
SDD flow
- Create an order using your corresponding platform secret api key configured for SDD
- The Customer is requested to fill up his bank information : IBAN, first name, last name; and confirm the SDD payment request. The Order transaction will be created with status
pending. - A few days later (approximately 10 bank working days for a first transaction and 5 bank working days for a recurring transaction), the transaction status will change to
captured - You get the asynchronous payment notfication via webhooks
order.completed - You can create next order with
directPaymentto debit again
Ask success@sharegroop.com for this payment method activation
Apple Pay
This payment method allows your user to use their Apple pay wallet to trigger the payment.
Orders & Transactions will be registered on your sharegroop platform as the other modules.
Apple pay UX
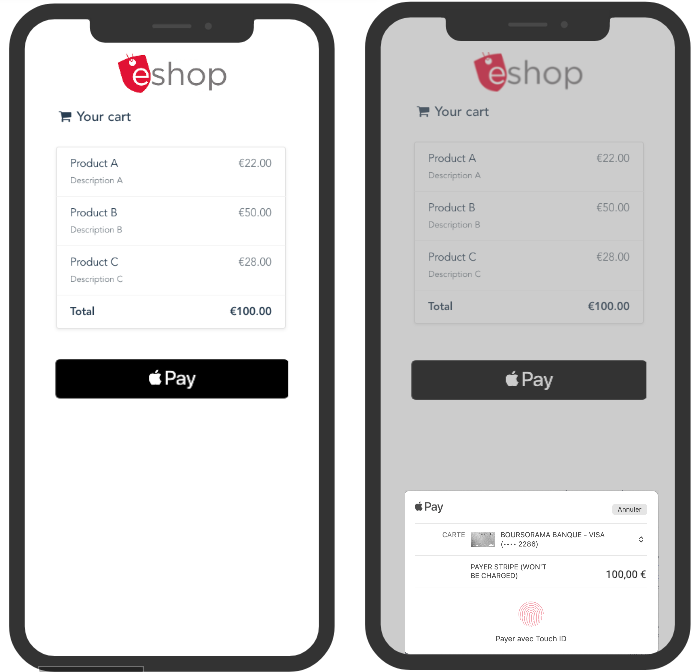
Apple Pay workflow
- You create an order using your corresponding platform secret api key
- You load the widget or redirect the users for them to pay on our modules UXs (depending on your integration choice)
- The Customer sees the pay with apple pay button
- Upon click, apple pay UI is displayed to the user, allowing him to choose his payment method registered in his apple account
- Once the user paid, you check for payment confirmation (synchronously, or asynchronously via our webhooks)
Ask success@sharegroop.com for this payment method activation
Apple Pay integration
There is no additional technical integration to enable this payment method. You can follow the same integration as
However, we must do a security setup to enable your domain for Apple.
- You will need to provide us the origin domain where the Apple Pay will be requested, such as example.com
- We will provide you with a verification file to expose on your server in this url : https://exemple.com/.well-known/apple-developer-merchantid-domain-association
Once this setup is confirmed, you will be able to securely load the apple pay UI.
Apple Pay testing
- Your web-browser or iOS device must be supported by Apple Pay.
- If you are not located in a country that Apple Pay currently support, testing an Apple Pay integration is not possible.
- For the Apple Pay button to show-up, you must also use a Sandbox Tester Account (or request one to our support), and be logged in your Apple ID of the test device with this test user.
Google Pay
This payment method allows your user to use their Google pay wallet to trigger the payment.
Orders & Transactions will be registered on your sharegroop platform as the other modules.
Google pay UX
Google pay UX is similar to Apple pay UX button.
Google does not let devices takes screenshots of the payment step
Google Pay workflow
- You create an order using your corresponding platform secret api key
- You load the widget or redirect the users for them to pay on our modules UXs (depending on your integration choice)
- The Customer sees the pay with google pay button
- Upon click, Google Pay UI is displayed to the user, allowing him to choose his payment method registered in his google personal account
- Once the user paid, you check for payment confirmation (synchronously, or asynchronously via our webhooks)
Ask success@sharegroop.com for this payment method activation
Google Pay integration
There is no additional technical integration or set-up to enable this payment method. You can follow the same integration as
Google Pay testing
- You must use Chrome, version 61 or newer
- You must use a real card on your Google Pay wallet. But since the sandbox will be setup for tests, no real payments will be made on your card.
Amazon Pay
This payment method allows your user to use their Amazon account to trigger the payment.
Orders & Transactions will be registered on your sharegroop platform as the other modules.
Amazon Pay UX
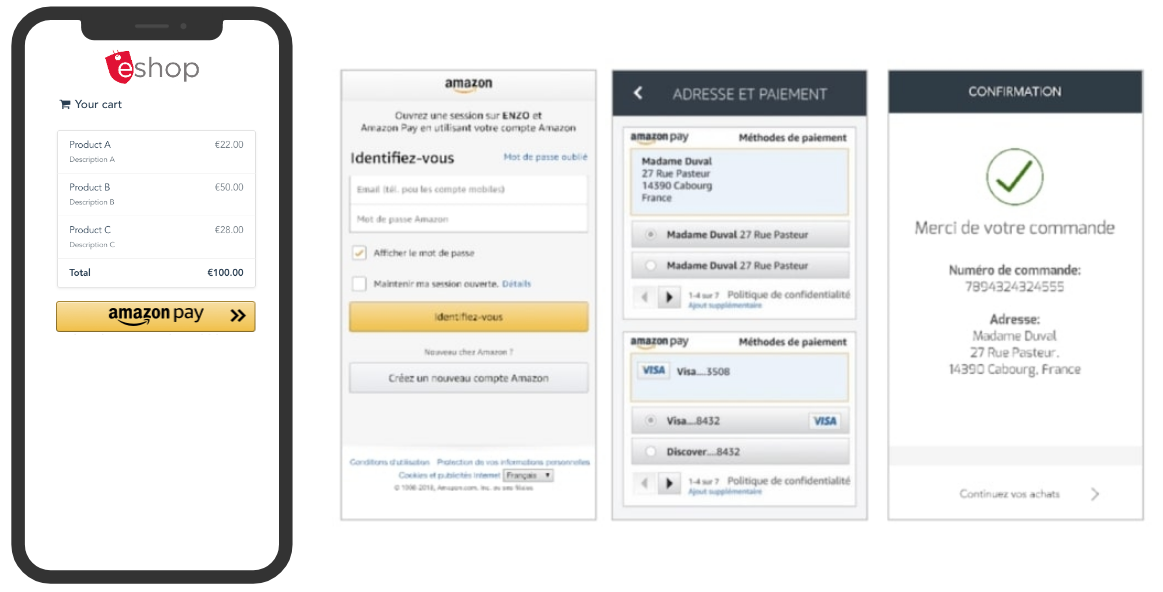
Amazon Pay workflow
- You create an order using your corresponding platform secret api key
- You load the widget or redirect the users for them to pay on our modules UXs (depending on your integration choice)
- The Customer sees the pay with amazon pay button
- Upon click, Amazon Pay UI is displayed to the user, allowing him to choose his payment method registered in his amazon personal account
- Once the user paid, you check for payment confirmation (synchronously, or asynchronously via our webhooks)
Ask success@sharegroop.com for this payment method activation
Amazon Pay integration
- You need to have an Amazon Seller account. You can register for Amazon Pay following this
- For security reason, you are also required to register on your Amazon account domains that will load Amazon Pay.
- Finally, you will have to generate Amazon credentials following thoses steps, and share the Merchant ID, Public Key, Public Key ID and Private Key (file .pem) to us se we can finalize the setup.
Once this setup is confirmed, you will be able to securely load the amazon pay UI.
Amazon Pay testing
- To test Amazon Pay, you should create an amazon test buyer account, within your Amazon Seller account following this guide
- Use Amazon Pay test cards
See Amazon Pay supported countries, regions & currencies
TIP
📖 To determine the best integration flow for your needs, please refer to your assigned Sharegroop Success Manager (or support@sharegroop.com).